Visio Draw Tangent Between Two Circles
three 4
To draw a straight line, you can apply the Pencil tool or the Line tool. The Pencil tool responds to the management of the mouse. If you elevate in a curving motion, Visio draws an arc. If you drag in a directly line, Visio draws a line segment. (Run into Figure 22-9.) If you're similar a lot of people, you try to drag in a straight line and end up with an arc anyhow. Fortunately, you can convert arcs to lines and vice versa—or you lot can utilize the Line tool, which e'er creates a straight line.
To create consecutive line segments at once, elevate with the Pencil or Line tool to describe the first line segment, and so lift your finger from the mouse button without moving the mouse. So drag to draw the next line segment. If the lines are crooked, wait until you're done cartoon the shape, and and so use the Pencil tool to repair crooked line segments.

Effigy 22-ix. As you lot drag with the Pencil tool, the pointer provides useful feedback by changing to evidence whether you're creating an arc or a line.
Converting Arcs to Lines
If you lot draw with the Pencil tool and cease up creating an arc segment when you meant to draw a direct line segment, you can repair the problem without redrawing the unabridged shape. The technique is a little tricky just in that it requires yous to work in the ShapeSheet window, but sometimes that'due south simpler than starting over. Hither's how you do information technology:
- Select the shape you want to revise, and then choose Window, Testify ShapeSheet.
- Scroll in the ShapeSheet window until yous can see the Geometry 1 section. If necessary, arrange the drawing window and the ShapeSheet window so that you tin run into both the shape and the Geometry 1 section.

Depending on the shape, the Name cavalcade of the Geometry department contains a variable number of rows labeled MoveTo, LineTo, and EllipticalArcTo.
- Click in the Ten column of the EllipticalArcTo row. On the drawing page, Visio highlights the vertex that corresponds to the point represented past the cell you have selected.
Tip
If the shape contains more than than one EllipticalArcTo row, click in the X columns for each one until the vertex that starts the arc you lot want to change is selected on the drawing page. - Correct-click the cell in the X column of the EllipticalArcTo row, and and so choose Change Row Type.
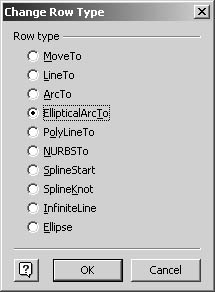
- Choose LineTo, and and then click OK.
- Close the ShapeSheet window.
Troubleshooting
Y'all can't select the vertex you want to change in the ShapeSheet window.
If the shape you're editing is actually a merged shape or a group, you might have difficulty locating a vertex. If the ShapeSheet window includes multiple Geometry sections labeled Geometry one, Geometry 2, and so on, the shape is a merged shape. Click each cell in the X column for all the Geometry sections until the corresponding vertex is selected on the cartoon page, and then proceed to brand the modify you want.
If you select a grouping, you won't see a Geometry section at all in the ShapeSheet window, but if y'all curl downwardly, you'll run into the Group Properties section. What you need to do is subselect the individual shape that contains the geometry you want to change, and and so display its ShapeSheet window.
Creating Infinite Lines
In sure drawing types, it'due south useful to align shapes to a line that acts as a reference. In Visio, you lot can drag a guide line out from the rulers and align shapes to that, but the guide's blue line interrupts a drawing. For technical or architectural drawings, you lot can create a true construction line and format information technology to look the fashion yous desire. Visio refers to these as infinite lines. Yous tin can create them by drawing a regular line with the Line tool and then editing the ShapeSheet to convert information technology to an infinite line, as Effigy 22-10 shows.
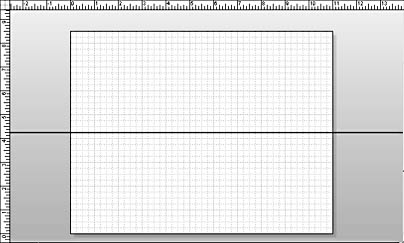
Figure 22-x. An infinite line extends indefinitely into space and is useful equally a reference for dimensions or setouts in structure and architectural drawings.
Follow these steps to create an infinite line:
- Utilise the Line tool to draw a line that extends in the management you want. With the line selected, choose Window, Show ShapeSheet.
- Scroll in the ShapeSheet window until y'all can come across the Geometry 1 section.
The Name column contains MoveTo and LineTo rows.
- Right-click the cell in the X column of the LineTo row, and then cull Modify Row Type.
- Select the InfiniteLine option, so click OK. Visio converts the line to an space line, only retains the line's original brainstorm and endpoints, which you lot can utilise to change the direction of the line.
- Close the ShapeSheet window.
Drawing Angled Lines
When you need to position shapes along precise 45-caste lines, Visio includes a feature with the rather generic name of cartoon aids that works similar the dynamic grid. How drawing aids are displayed differs depending on which cartoon tool y'all're using, but similar the dynamic grid, they announced on-screen as dotted lines that prove you lot where to draw, as Figure 22-11 shows.
To make drawing aids visible, choose Tools, Snap & Glue, and so select the Drawing Aids check box. Depending on the drawing tool you apply, you lot'll come across the following:
- If you select the Line tool, dotted extension lines appear at 45-degree increments as yous draw. This makes it easy to draw lines at 0, 45, 90, 135, 180, 225, 270, or 315 degrees from a betoken.
- If you select the Rectangle or Ellipse tool, drawing aids show where yous tin can end the shape along a 45-, 135-, 225-, or 315-caste line to create a circle or square.
Tip
If the Snap & Glue toolbar is visible, you can enable and disable the drawing aids by clicking the Drawing Aids tool.
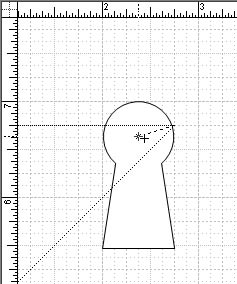
Figure 22-eleven. You can plough on drawing aids to brandish reference lines at 45-degree intervals.
Cartoon Tangent Lines on Curves
Together, the shape extension lines and the Line tool make information technology very easy to create lines that are perfectly tangent to one or two curves, equally Effigy 22-12 shows.
Effigy 22-12. When you brandish the bend interior tangent extension line, you tin draw a line that is perfectly tangent with respect to two curves.
The post-obit steps were provided past the Visio engineer who designed this characteristic, which he admits many users never observe. But it'southward cool, and it works. Here's how:
- Choose Tools, Snap & Glue, and then make sure that Shape Extensions and Shape Geometry are selected in the Snap To column.
- Click the Advanced tab, select Curve Interior Tangent in the Shape Extension Options listing, and then click OK.

- Click the Pencil, Ellipse, or Arc tool, and so draw the circle or curve you want.
- Click the Line tool, and then betoken to the edge of the curve where yous desire the line to start. As y'all start to drag with the Line tool, an extension line appears to show you the line that is tangent with respect to the circle. Depending on the direction you elevate, two lines tin can announced, one showing the tangent line and the other showing a perpendicular line.
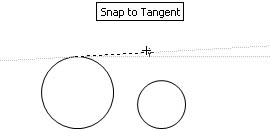
- Continue to drag on the tangent line until it turns ruby.
Red signifies "tangent mode." If the line doesn't turn red, try dragging slowly back and along along the tangent line. Once y'all enter tangent mode, the line remains tangent to the circle equally you drag. You can elevate in tangent laps effectually the circle if you want.
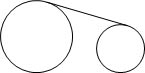
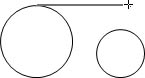
- To create a line that's tangent with respect to a second bend, drag the endpoint to the other curve until the line turns blue.
Tip
To work with the start tangent betoken just, press the Ctrl key every bit you drag the line. Pressing Ctrl is also a good technique for creating a tangent line on a crowded drawing page.
Drawing Accurate Geometry with Shape Extension Lines
Only as the dynamic grid shows you options for aligning shapes, shape extension lines bear witness you how to draw lines and arcs accurately with respect to other shapes, as Figure 22-xiii shows. Displaying shape extension lines is similar to using object snaps in CAD programs. They announced on-screen as dotted lines or snap points when you're using the Line, Arc, Freeform, Pencil, Ellipse, Rectangle, or Connection Bespeak tools.
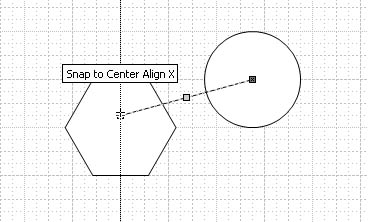
Figure 22-13. Shape extension lines show you where to snap to precise points on shape geometry.
You tin can choose to display unlike types of shape extension lines, which Visio identifies with ScreenTips as you're cartoon. For instance, you tin can draw a line that intersects some other line at its exact midpoint, or y'all tin ensure that the arc you're drawing begins and ends in verbal relationship to existing shapes. Tabular array 22-one describes each type of shape extension line (except isometric angles, which are described shortly).
Tip - Turn Off ScreenTips
ScreenTips are helpful, just they tin also overcrowd your screen. To turn them off, choose Tools, Options, so click the View tab. Clear the Other ScreenTips bank check box, and then click OK.
Table 22-1. Shape Extension Lines
| Selection | Description | Option | Description |
|---|---|---|---|
| Alignment Box Extension | Displays an extension line from the shape's alignment box then that you tin marshal shapes past their edges | Curved Extension | Displays an extension line from an arc segment to course an ellipse or from the nearest signal on a spline to extend the curve |
| Center Alignment Axes | Displays an extension line from the nearest the shape'southward alignment box then that you tin align shapes by their centers | Endpoint Perpendicular | Displays a perpendicular line from the nearest endpoint of a line or arc segment so that you can create two correct angles with ii lines |
| Curve Interior Tangent | Displays an extension line that shows a curve's tangent at the midpoint of the arc segment so that y'all can create a tangent to the arc | Midpoint Perpendicular | Displays a perpendicular line from the midpoint of a line or arc segment so that you can create four right angles with two lines |
| Segment Endpoint | Highlights an endpoint of an arc or line segment so that you tin connect a shape or line to a segment's endpoint | Horizontal Line At Endpoint | Displays a horizontal line (with respect to the screen) on the endpoint of a line or arc segment then that you lot can identify a horizontal line on another line's endpoint |
| Segment Midpoint | Highlights a midpoint of an arc or line segment and so that y'all can connect a shape or line to a segment's midpoint | Vertical Line At Endpoint | Displays a vertical line (with respect to the screen) on the endpoint of a line or arc segment so that you can place a vertical line on some other line'south endpoint |
| Linear Extension | Extends a line segment from the endpoint you're almost so that you lot can see where the line would be continued | Ellipse Eye Point | Highlights the middle signal of an ellipse so that you can connect lines to the centre |
Displaying Shape Extension Lines
Follow these steps to turn on shape extension lines:
- Cull Tools, Snap & Glue.
- Under Snap To, make sure the Shape Extensions option is selected. This
choice turns on whatsoever shape extensions yous take selected on the Avant-garde tab. - Click the Advanced tab. In the Shape Extension Options listing, select the type of extensions you want, and so click OK.
- To display the shape extension lines, click a cartoon tool, and and then move the arrow toward or along a shape.
InsideOut
There's some overlap in the part of drawing aids and shape extension lines, both of which appear as options in the Snap & Glue dialog box. Retrieve of drawing aids as a simpler set of tools that show yous how to draw tangent and perpendicular lines. Drawing aids do not include ScreenTips. Both drawing aids and shape extension lines use the same cartoon engine.
Displaying and Controlling Isometric Alignment Tools
If you are cartoon isometric diagrams (two-dimensional drawings that represent 3-dimensional objects), isometric extension lines tin help you draw lines along isometric planes. As Figure 22-fourteen shows, these lines are simply a type of shape extension line, but they differ from the other types in that you can specify the bending of the line that appears when you lot draw. When you use a drawing tool, the isometric bending lines appear as dotted lines that extend from a vertex at an angle, or prepare of angles, that you specify.
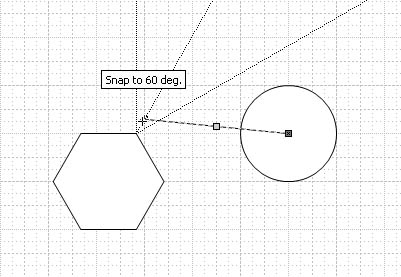
Figure 22-xiv. You tin specify a series of isometric angles to provide snap-to points for an isometric cartoon.
Follow these steps to display isometric shape extension lines:
- Choose Tools, Snap & Gum, and then click the Advanced tab.
- Scroll to the lesser of the Shape Extension Options list, then select Isometric Angle Lines.
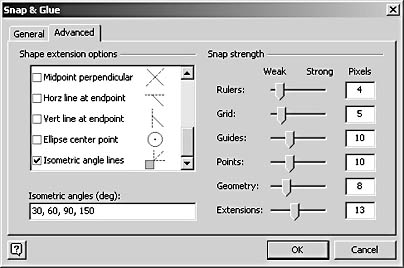
- In the Isometric Angles (Deg) box, type the measures, in degrees, of the angles you want to apply for isometric angles, separated by commas. You can specify upwardly to ten angles (in degrees) in this box. For case, type 30, 60, 150.
- Click OK.
Note
The value in the Isometric Angles (Deg) box is also used when you rotate a shape while holding down the Shift fundamental. Past default, Visio constrains the angle of rotation to 30, 45, and 60 degrees. However, if you've entered new values in the Isometric Angle field, Visio cycles through that listing of angles.
Source: https://flylib.com/books/en/2.332.1.146/1/
0 Response to "Visio Draw Tangent Between Two Circles"
Post a Comment