what happened to the google maps where you could print out the turn by turn maps
Mapping from a Google Spreadsheet
This tutorial shows yous how to enter data in an on-line spreadsheet to generate a prepare of placemarks in Google Earth. Google's web-based, collaborative editing allows you and your team members to simultaneously enter data and instantly publish updates. Using this tool you lot could: showcase your organisation'due south projects, programme sites or partners; map your offices, volunteers, or resource; or visualize your data on local, regional or global scales.
Some of the new and improved features in Spreadsheet Mapper version 3 include:
- Create 1000 placemarks - add more if needed.
- Six simplified balloon blueprint templates - add together more than if needed
- Simplified publication process
- Additional customization options
Spreadsheet Mapper 3 uses Google Apps Scripts to assistance generate the KML placemarks, and to provide useful tools.
Tutorial Contents
-
Before you begin
-
Let'south become started...
-
Open the starter spreadsheet
-
Enter bones data and publish your spreadsheet
-
View the sample placemarks & templates in Google Earth
-
Enter your own information
-
Prepare your template
-
Enter placemark names and locations
-
Utilise a template to each placemark
-
Optional: Setting Fourth dimension, LookAt views and Snippets
-
Publish and view your changes
-
Need more or less rows?
-
Add more rows...
-
Remove some rows...
-
Messed up your rows or formulas?
-
Sharing your placemarks
-
Sharing your map as a layer in Google Earth
-
Discussion, Feedback & Questions
-
What's Next
-
More tutorials...
Before you lot brainstorm
Spreadsheet Mapper is a powerful tool for mapping indicate locations. It starts with enough spreadsheet rows for i,000 placemark points, and provides a tool for adding boosted rows. Adding more than than a few k rows/points will wearisome down the spreadsheet mapper, and produce a very large KML file.
Let'due south get started...
Open the starter spreadsheet
-
To brainstorm, open up a copy of the starter spreadsheet using the link below, which will create a new spreadsheet in your Google Docs business relationship. You may need to log into your Google Account to proceed. When asked if you want to make a new copy of the certificate, click "Yes, make a copy."
Spreadsheet Mapper v3 - get a new copy
-
One time opened in your business relationship, give the new spreadsheet an advisable proper name by clicking on the championship, or from the menu bar, select File > Rename...
-
Cheque that the Spreadsheet Mapper menu has appeared at the top (next to the 'Help' menu). If y'all don't encounter the Spreadsheet Mapper carte, attempt refreshing the web page. After the spreadsheet re-loads, look a few seconds and the bill of fare should announced.

Enter basic information and publish your spreadsheet
-
On the offset hither sail, complete "Writer's Information" and "About your KML Document" in the Basic Information department.

-
Optional: Access the "Avant-garde/Optional Settings" by clicking the tab indicated on the left to united nations-hide rows.
-
From the carte bar, select File > Publish to the Web...

-
In the dialog box, expand the "Publish content & settings" section and un-check the Automatically republish when changes are made box.
-
Click the Publish button, and then click Close to dismiss the dialog.

View the sample placemarks & templates in Google Earth
-
Copy the Network Link KML
Select the "Network Link KML" cell by single clicking the cell (do non double-click to edit). Copy the contents with Ctrl-C or Right-Click > Re-create.

Note that even though the network link volition always announced, it volition not work until your spreadsheet is published to the spider web.
-
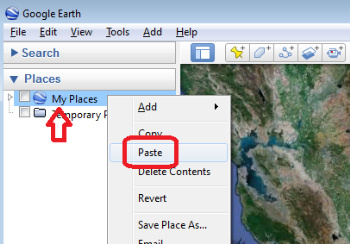
Paste into Google World
Switch to Google Earth, select the My Places or Temporary Places folder in the left-manus panel, then Paste using Ctrl-V or Right-Click > Paste.
-
The sample placemarks volition be displayed in Google Earth. These placemarks show the starter balloon templates built into the spreadsheet.
-
Click on the sample placemarks and decide which balloon templates yous would like to use for your projection.

-
You will as well be able to customize the HTML based balloon templates, or create your own.
Enter your own information
Prepare your template
-
Go to the sheet for the template(s) you lot've chosen.
-
Optional: Give the sheet a new proper name (eg: "Tem_OurSites").

-
Scroll downward to the "Static Variables" department of the template and supercede the values with your information, where applicative.

-
Optional: To change the expect of the placemark icons and labels, alter the values of the "KML Mode Variables" every bit desired.

Enter placemark names and locations
-
Go to the PlacemarkData sail, and delete the sample data in the white cells.
-
Beginning creating placemarks past entering your ain data! A proper name and location are required for each placemark. A template sail proper noun is also required, but we'll get to that below. Location coordinates must be in decimal caste format (e.one thousand. -122.34567).

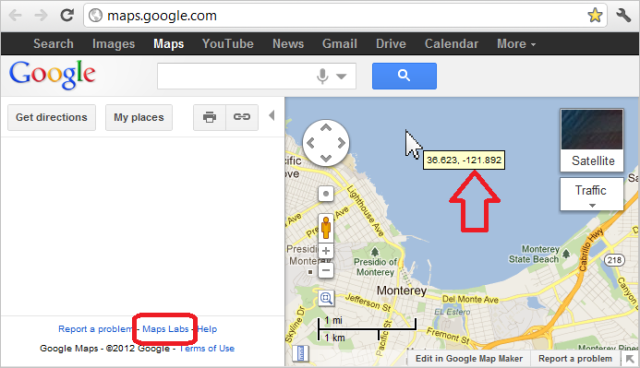
Tip: Don't know the latitude or longitude coordinates of your location? You tin can get a location's latitude and longitude from Google Maps. Simply become to maps.google.com, correct-click on the desired location on the map and select "What'southward here?" from the menu. Then expect at the pop up at the bottom center of the page, where the breadth and longitude volition be listed. Spreadsheet Mapper can likewise accept addresses instead of location coordinates, simply it is non recommended, since a KML with addresses requires Google Globe to look upwards and geocode each address, every time a user opens the file.
-
Optional: Put your placemarks into folders by specifying a "Binder name". All the placemarks in the aforementioned folder must be grouped together, otherwise duplicate folders with the same proper name will be created. One way to do this is to employ the dropdown menu in the "Folder Name" column header, and select "Sort Sheet". This volition sort all the data beneath the "freeze sail" divider bar, and group your placemarks into folders.

Apply a template to each placemark
-
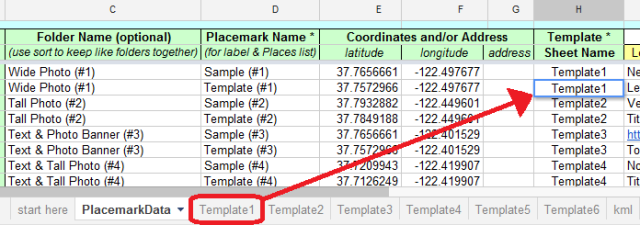
Each placemark needs a template, to make up one's mind its icon, info-airship layout, and other styles. Designate a template for each placemark by entering the desired Template Sail Proper name into column H. The Template Sheet Name is the proper noun of the Template's canvas/tab at the bottom of your spreadsheet. (Spreadsheet Mapper version 2 used a unique name defined in each template, only in version three, we but use the template sheet names.)
-
Each template uses the spreadsheet's columns for dissimilar pieces of balloon content (e.g. for Template #1, cavalcade J = "Subtitle", but for Template #iii, column J = "Image URL"). Make sure y'all enter each placemark's information co-ordinate to the appropriate column headers equally show in the template list.
-
To make information entry easier, and to show you which cavalcade is which for each template, you can highlight a specific template past entering its canvass name in cell I9. That template's column headers will appear in row 10, at the height of your data columns, as shown below.

Optional: Setting Fourth dimension, LookAt views and Snippets
-
You tin can enter advanced placemark information including LookAt (aka: snapshot-view), TimeStamp or TimeSpan (come across valid fourth dimension formats), and Snippet tags.
-
On the PlacemarkData canvass, click the indicated tab in the upper correct of the sail to un-hide the extra columns, and enter avant-garde values for your placemarks.

Publish and view your changes
Each time you make a change to the information in your spreadsheet, past editing the placemark data, the start here sheet, or i of your balloon templates, you must re-publish your changes in order to see them in your KML on Google Earth or Maps.
-
Ensure that your KML is ready by looking at the KML Processing Status box at the top of your PlacemarkData sheet. If in that location are Errors indicated, gyre down the PlacemarkData sheet to observe which rows they are in and fix them, otherwise those rows may be missing from your KML. If there are Warnings, those rows will ordinarily have KML generated, but may not be right.

-
From the menu bar, select: File > Publish to the web..., and click the Republish at present button. Click the Close button to dismiss the dialog box.

Note: In the "Publish to the web" dialog, there is a checkbox to "Automatically republish when changes are made". Nosotros recommend that you lot practise Not check this box. This will assistance prevent errors caused by the spreadsheet automatically republishing when the KML generation is in progress.
-
In the Places panel, Right-Click on the Network Link you added earlier, and select "Refresh" to load your changes. A second refresh of the Network Link may be required to run across fashion changes made on the template sheets.

Need more than or less rows?
Add more rows...
If you want to create more than 1000 placemarks, you tin can easily add together more than rows to Spreadsheet Mapper.
-
From the menu bar, select Spreadsheet Mapper > add more than rows.
If you don't see the Spreadsheet Mapper card, attempt refreshing the web page. After the spreadsheet re-loads, wait a few seconds and the menu should announced.

-
In the dialog box, enter the number of rows you want to add together (upwardly to 500 at a time).

-
Click Ok and look for the confirmation that rows have been added. The script will add the requested number of rows to both the "PlacemarkData" canvas, and the "kml" canvas.
Annotation: Adding more than rows will cause the scripts to exist slower at processing your data and producing your KML. It as well increases the size of your KML, which volition already be rather large if you are using all 1000 rows.
Remove some rows...
If y'all added more rows than you needed, or yous only want to optimize your spreadsheet and KML by removing unused rows, we've provided a tool for that too.
-
From the card bar, select Spreadsheet Mapper > remove some rows.
If y'all don't run across the Spreadsheet Mapper carte, try refreshing the web folio. After the spreadsheet re-loads, wait a few seconds and the carte du jour should announced.
-
In the dialog box, enter the number of rows yous want to remove (upwardly to 500 at a fourth dimension) from the bottom of your PlacemarkData sheet.
-
Click Ok and wait for the confirmation that rows have been removed. If the rows to exist removed from your PlacemarkData canvass contain information, you will become a alarm message and a chance to cancel the operation.
Messed up your rows or formulas?
At that place are a number of ways that the rows and formulas in your spreadsheet might become messed upward and end working correctly. Some common mistakes include:
- Adding or deleting rows manually (directly in the spreadsheet, instead of using the tools in the Spreadsheet Mapper card)
- Dragging rows, cells, or columns of information to motion them inside the PlacemarkData sheet
- Deleting or pasting over critical formulas in the PlacemarkData or KML sheets
If y'all have done any of these things, or are seeing unusual errors in your KML, then information technology is possible that the number of placemark generation rows in your KML sheet no longer corresponds to the number of data rows in your PlacemarkData sail, or that one or more than formulas in those sheets were corrupted. If and so, nosotros provide a script that volition endeavor to repair such errors:
-
From the menu bar, select Spreadsheet Mapper > repair rows & formulas.
If yous don't come across the Spreadsheet Mapper menu, try refreshing the web folio. Subsequently the spreadsheet re-loads, wait a few seconds and the card should appear.
-
Read the dialog box and click Ok to continue.
-
The script will add or remove placemark generation rows in the KML sheet to make them friction match the data rows in your PlacemarkData sail. It volition and then replace the formulas in columns A and B of your PlacemarkData canvas, and in Column A (row 11 and below) in your KML sail. This should repair about row and formula issues.
Sharing your placemarks
Anyone tin can view the placemarks generated by your spreadsheet in Google Earth. Y'all tin help make it like shooting fish in a barrel for them with the techniques below.
Sharing your map as a layer in Google Earth
There are two ways to share your placemark map with Google Earth users. Ane is to employ a link direct to the spreadsheet, and then that Google Earth can always get the latest updated information/KML from your spreadsheet. This is useful for datasets that you update frequently, and for users who will always accept an internet connection. The other method is to make a static snapshot of your information, and share that as a KML file with all the placemark information inside it. This is useful for datasets that don't change equally much, or for users who want to view the KML when they are working offline. Sharing a static version of our KML is also useful if you want to continue editing your Spreadsheet Mapper, without your users seeing the edits... until you create a new static snapshot.
To share access to an automatically updating KML linked directly from the spreadsheet:
-
In Google Earth'southward Places panel, Right-Click your Network Link and cull Salvage Identify As...

-
Give the file a descriptive name and save it to your computer as a KML or KMZ file.
-
E-mail the KML/KMZ file to your colleagues and friends, or postal service the file on your website. This file contains a KML Network Link, and then when users open information technology in Google Earth, it will retrieve the latest data directly from your published spreadsheet.
To share a static snapshot of your current KML, which contains all the information merely will not get updates from the spreadsheet:
-
In Google Globe's Places panel, notice the superlative-level folder of your map. It is the first item/folder nether the network link, and will likely have have a bluish world icon.
-
Right-Click the top-level folder and choose Save Identify Equally...

-
Give the file a descriptive name and relieve it to your figurer as a KML or KMZ file.
-
Email the KML/KMZ file you saved to your colleagues and friends, or mail the file on your website. This file contains a static snapshot of your map data. Users of this file will not have access to updates direct from the spreadsheet, just the file volition work even when offline, since it does not need a connexion to the spreadsheet.
Discussion, Feedback & Questions
Practice you have questions about this tutorial or about Spreadsheet Mapper? Do you want to requite usa feedback or discuss with other users and experts? Visit the "Nonprofit Outreach / Education" department on the Google Globe discussion forum to find answers, inquire questions, and discuss with others:
Google Earth Forum - Nonprofit Outreach / Teaching
What's Next
More tutorials...
Come across all the tutorials and tools available from Earth Outreach.
Source: https://www.google.com/earth/outreach/learn/mapping-from-a-google-spreadsheet/
0 Response to "what happened to the google maps where you could print out the turn by turn maps"
Post a Comment